Eyebrows can change the way your whole face looks. They frame the eyes, balance facial features, and give your makeup a more polished finish.
Whether you like soft, natural brows or bold, defined arches, learning how to draw eyebrows properly can make your daily beauty routine much easier.

Good brows do not need to look overly perfect. The goal is to enhance your natural shape while filling sparse areas in a clean and flattering way.
Benefits of Well-Shaped Eyebrows
Well-shaped eyebrows can make your face look more balanced and lifted. They help define the eyes, soften strong features, and create a neater appearance even when you wear very little makeup.
The right brow shape can also make your face look more awake and fresh. A gentle arch can add lift, while straighter brows can balance longer face shapes. Most importantly, groomed brows can boost confidence because they make your overall look feel complete.
Tools You Need to Draw Eyebrows

Before starting, keep a few basic tools ready. You may need an eyebrow pencil or brow powder, a spoolie brush, an angled brush, concealer, tweezers, small scissors, brow gel, and a mirror with good lighting.
Choose a brow product close to your natural hair color. A shade that is too dark can make your brows look harsh, while a shade that is too light may not define them enough.
Find the Right Brow Shape for Your Face
Your face shape can help guide your eyebrow style. For a round face, a higher arch can create a lifted look. For an oval face, soft and natural arches usually work best. A square face can carry stronger, more structured brows because they balance the jawline.

For a heart-shaped face, soft rounded brows help reduce sharpness around the forehead and chin. If you have a long face, flatter brows can create the illusion of width and make the face appear more balanced.
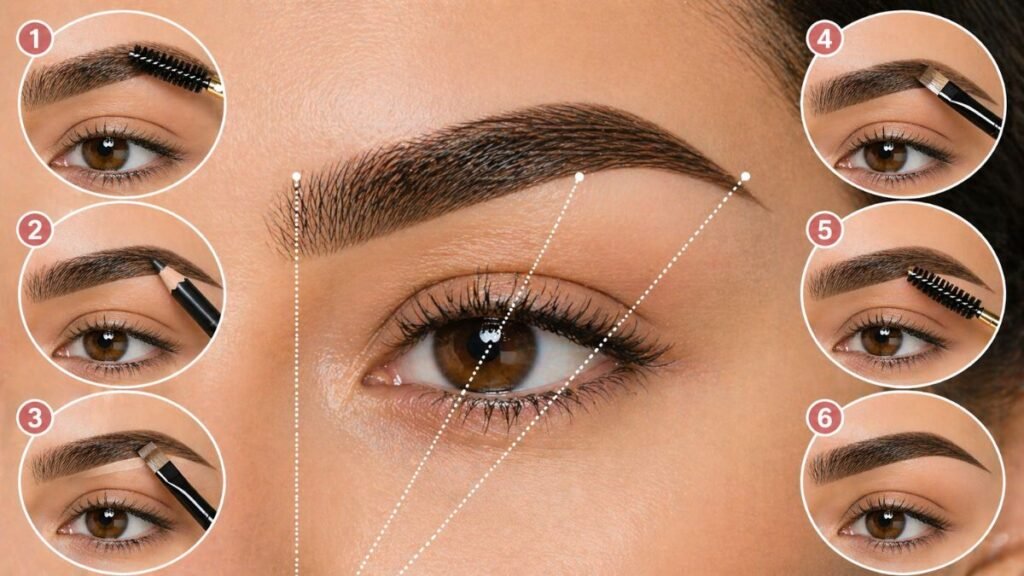
Natural Brow Mapping
Brow mapping helps you understand where your eyebrows should begin, arch, and end. Hold a brush straight beside your nose to find the starting point. Then angle it from the side of your nose through the center of your eye to locate the arch. Finally, tilt it toward the outer corner of your eye to find the ending point.
This method keeps your brows proportional and prevents over-drawing or over-plucking.
How to Draw Eyebrows Step by Step
Start by brushing your eyebrow hairs upward and outward with a spoolie. This shows your natural shape and reveals any gaps.
Next, lightly outline the lower edge of your brow using soft strokes. Avoid pressing too hard because dark lines can look unnatural. Then outline the top edge gently, following your natural brow growth.
Fill in sparse areas with small, hair-like strokes. Keep the front of the brows lighter and focus more product on the arch and tail. This creates a natural gradient instead of a blocky look.
After filling, blend everything with a spoolie. Blending softens the product and makes the brows look more natural. For a cleaner finish, apply a little concealer around the edges using an angled brush.
Finally, set your brows with clear or tinted brow gel so the hairs stay in place throughout the day. This gives your brows a neat and long-lasting finish.
Tips for Natural-Looking Brows
Use light strokes, build product slowly, and always follow your natural brow shape. Avoid filling the front too heavily, and trim long hairs only when needed. Remember, eyebrows should look like sisters, not twins, so small differences are normal.
Common Mistakes to Avoid
Avoid over-plucking, using a shade that is too dark, drawing harsh square fronts, skipping blending, or applying too much product. These mistakes can make eyebrows look heavy and unnatural.
Conclusion
Learning how to draw eyebrows is simple with the right steps and tools. By mapping your brows, filling gaps gently, blending well, and setting the hairs in place, you can create brows that look natural, balanced, and flattering.
With practice, your eyebrow routine will become quicker, cleaner, and more confident.